Service Account Authentication Guide
This guide provides comprehensive instructions for authenticating with Centrali using service accounts and obtaining JWT tokens for API requests.
Table of Contents
- Overview
- Prerequisites
- Creating a Service Account
- Obtaining JWT Tokens
- Using JWT Tokens in API Requests
- Token Details
- Service Account Management
- Troubleshooting
Overview
Centrali uses OAuth 2.0 client credentials flow for service account authentication. Service accounts are machine-to-machine clients that can authenticate and obtain JWT tokens to access Centrali APIs programmatically.
Authentication Flow: 1. Create a service account to obtain client_id and client_secret 2. Exchange these credentials for a JWT access token 3. Use the JWT token in API requests via the Authorization header
When to Use Service Accounts
Use service accounts when no end user is present and your application needs machine-to-machine access.
Common cases:
- backend APIs and server-rendered apps
- cron jobs and scheduled syncs
- CI pipelines and deployment tasks
- inbound webhook consumers that need to call Centrali
- internal scripts and operational tooling
Do not put client_secret values in browser or mobile code. If the request should run on behalf of a signed-in user from your own identity system, use External Auth (BYOT) instead.
Core Rules
- Service account auth is workspace-scoped. The token and the workspace slug in your request must refer to the same workspace.
- Service account permissions come from group membership, not from the token request itself.
- Use
https://auth.centrali.io/oauth/tokento mint tokens. - Use
https://api.centrali.io/data/workspace/{workspace}/api/v1/...for data API requests made with those tokens.
Prerequisites
Before you can create a service account, you need:
- Workspace Access: You must belong to a workspace
- User Authentication: A valid user JWT token to authenticate workspace-scoped API calls
- Workspace Slug: The slug identifier for your workspace
- Permissions: Appropriate permissions to create service accounts in your workspace
Creating a Service Account
Via the Dashboard
The easiest way to create a service account is through the Centrali Console:
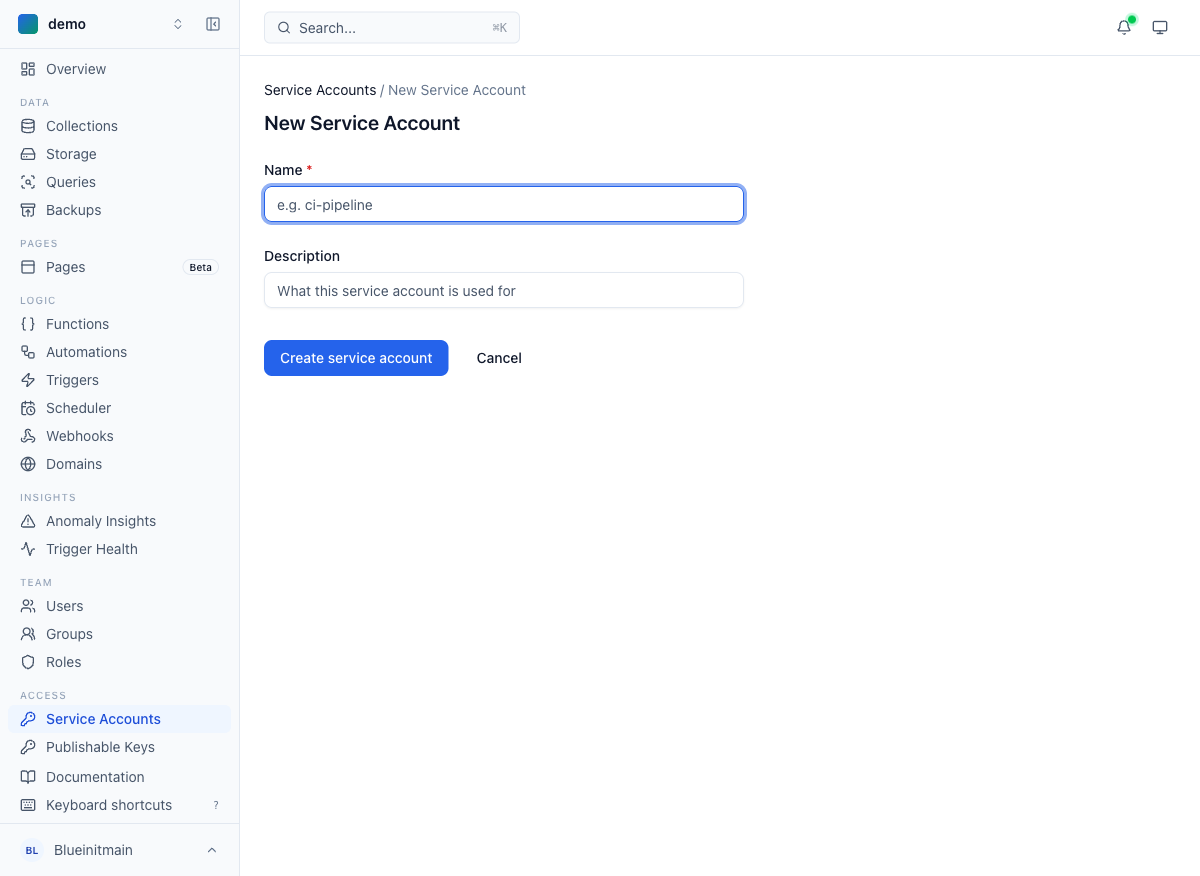
- Navigate to your workspace
- Open Access → Service Accounts
- Choose New Service Account (or Create service account on an empty list)
- Fill in the details and submit Create service account
- Copy and securely store the
client_idandclient_secret
Via the API
To create service accounts programmatically, you need a user JWT token.
Step 1: Obtain User JWT Token
First, you need to authenticate as a user through the standard OIDC flow. This is typically done through the Centrali web interface. Once authenticated, you'll have a user JWT token.
Step 2: Create a Service Account
Endpoint: POST /workspace/{workspaceSlug}/api/v1/service-accounts
Headers:
Request Body:
{
  "name": "My API Service Account",
  "description": "Service account for production API integration",
  "grant_types": ["client_credentials"],
  "scope": "openid"
}
Parameters: - name (required): A descriptive name for your service account - description (optional): A detailed description of the service account's purpose and scope - grant_types (optional): Array of grant types, defaults to ["client_credentials"] - scope (optional): OAuth scopes, defaults to "openid"
For local testing, keep credentials outside the repo and load them from your shell or Postman environment:
export USER_ACCESS_TOKEN="<paste-user-access-token>"
export SERVICE_ACCOUNT_CLIENT_ID="<paste-service-account-client-id>"
export SERVICE_ACCOUNT_CLIENT_SECRET="<paste-service-account-client-secret>"
export SERVICE_ACCOUNT_ACCESS_TOKEN="<paste-service-account-access-token>"
Example using curl:
curl -X POST "https://auth.centrali.io/workspace/acme-corp/api/v1/service-accounts" \
  -H "Authorization: Bearer ${USER_ACCESS_TOKEN}" \
  -H "Content-Type: application/json" \
  -d '{
    "name": "Production API Client",
    "description": "Main service account for production API access",
    "grant_types": ["client_credentials"],
    "scope": "openid"
  }'
Response (201 Created):
{
  "id": 123,
  "clientId": "sa_a1b2c3d4e5f60718293a4b5c6d7e8f90",
  "clientSecret": "<generated-client-secret>",
  "name": "Production API Client",
  "description": "Main service account for production API access",
  "workspace": "acme-corp",
  "grant_types": ["client_credentials"],
  "scope": "openid",
  "createdAt": "2025-01-15T10:30:00Z",
  "createdBy": "user-uuid-123"
}
After creation, open the service account details page to confirm the client ID and status:

IMPORTANT:
- The
clientSecretis shown only once during creation - Store it securely - you cannot retrieve it again
- If lost, you'll need to rotate the secret via the rotation endpoint
Step 3: Assign Service Account to a Group
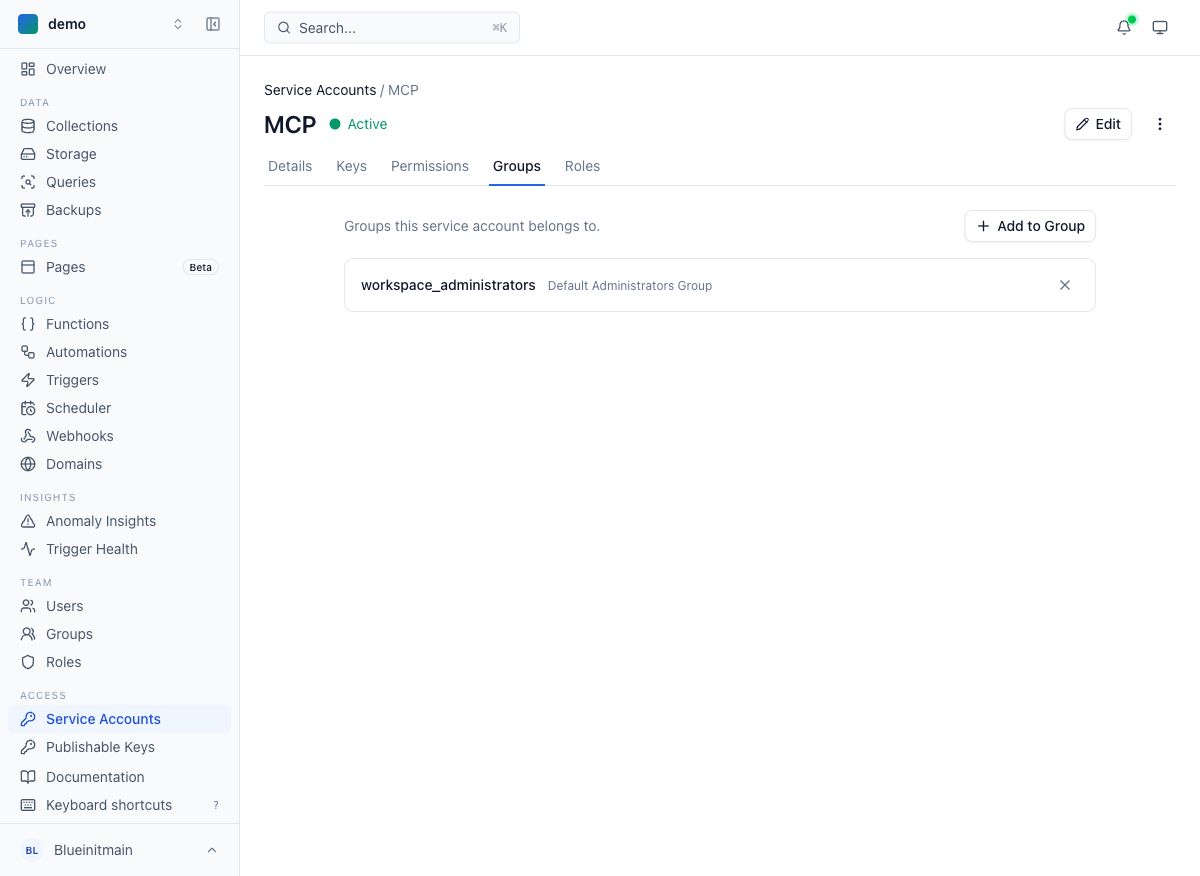
Service accounts need group membership to have the correct permissions. Without a group assignment, the service account will not have access to any resources — every API call will return 403 Forbidden.
Development access
Follow Account Setup: open the service account's Groups tab, choose Add to Group, and select workspace_developers. This built-in group grants build-resource access without workspace administration. Your user and service account need separate group assignments. If you cannot see Access, ask a workspace administrator to complete this step.
Custom access
For a narrower integration, an administrator can create a group in Team → Groups and configure its resource actions and policy conditions under Access → Permissions. For example, a collection/record reader needs structures list/retrieve and records list/retrieve access. Add the service account to that group and verify an API request using a fresh token.
Use workspace_administrators only when the service account actually needs broad workspace administration. Add the service account directly to the group.
See Policies and Permissions for the full list of resources and actions.
Obtaining JWT Tokens
Once you have a service account, use the OAuth 2.0 client credentials flow to obtain JWT tokens.
Token Endpoint
Endpoint: POST /oauth/token
Content-Type: application/x-www-form-urlencoded
Request Parameters: - grant_type: Must be client_credentials - client_id: The exact service account client ID returned at creation or by the list endpoint. New accounts use sa_ + 32 hex characters; existing legacy values remain valid. - client_secret: Your service account client secret (starts with sk_) - scope (optional): Requested scopes, e.g., openid
Example: Obtain JWT Token
Using curl:
curl -X POST "https://auth.centrali.io/oauth/token" \
  -H "Content-Type: application/x-www-form-urlencoded" \
  -d "grant_type=client_credentials" \
  -d "client_id=${SERVICE_ACCOUNT_CLIENT_ID}" \
  -d "client_secret=${SERVICE_ACCOUNT_CLIENT_SECRET}" \
  -d "scope=openid"
Using Python:
import os
import requests

token_url = "https://auth.centrali.io/oauth/token"

payload = {
    "grant_type": "client_credentials",
    "client_id": os.environ["SERVICE_ACCOUNT_CLIENT_ID"],
    "client_secret": os.environ["SERVICE_ACCOUNT_CLIENT_SECRET"],
    "scope": "openid"
}

response = requests.post(
    token_url,
    data=payload,
    headers={"Content-Type": "application/x-www-form-urlencoded"}
)

token_data = response.json()
access_token = token_data["access_token"]
print(f"Access Token: {access_token}")
Using Node.js:
const axios = require('axios');
const qs = require('querystring');

const tokenUrl = 'https://auth.centrali.io/oauth/token';

const payload = {
  grant_type: 'client_credentials',
  client_id: process.env.SERVICE_ACCOUNT_CLIENT_ID,
  client_secret: process.env.SERVICE_ACCOUNT_CLIENT_SECRET,
  scope: 'openid'
};

axios.post(tokenUrl, qs.stringify(payload), {
  headers: {
    'Content-Type': 'application/x-www-form-urlencoded'
  }
})
.then(response => {
  const accessToken = response.data.access_token;
  console.log('Access Token:', accessToken);
})
.catch(error => {
  console.error('Error:', error.response?.data || error.message);
});
Successful Response
Status: 200 OK
{
  "access_token": "<service-account-access-token>",
  "token_type": "Bearer",
  "expires_in": 3600,
  "scope": "openid"
}
Response Fields: - access_token: The JWT token to use for API authentication - token_type: Always Bearer - expires_in: Token validity in seconds (1 hour = 3600 seconds) - scope: Granted scopes
Using JWT Tokens in API Requests
Once you have a JWT token, include it in the Authorization header of all API requests.
Example: List Collections
curl -X GET "https://api.centrali.io/data/workspace/acme-corp/api/v1/collections" \
  -H "Authorization: Bearer ${SERVICE_ACCOUNT_ACCESS_TOKEN}"
Example: Create a Record
curl -X POST "https://api.centrali.io/data/workspace/acme-corp/api/v1/records/slug/products" \
  -H "Authorization: Bearer ${SERVICE_ACCOUNT_ACCESS_TOKEN}" \
  -H "Content-Type: application/json" \
  -d '{
    "name": "Laptop Pro",
    "price": 1299.99,
    "inStock": true
  }'
Token Details
Token Lifetime
- Access Token: 1 hour (3,600 seconds)
- Refresh Tokens: Not available for service accounts (client credentials flow)
- Token Reuse: Store and reuse tokens until they expire to reduce load
Token Claims
Service account JWT tokens include the following claims:
{
  "sub": "sa_a1b2c3d4e5f60718293a4b5c6d7e8f90",           // Client ID (subject)
  "iss": "https://auth.centrali.io",    // Issuer
  "aud": "https://api.centrali.io",         // Audience
  "iat": 1705326000,                           // Issued at (Unix timestamp)
  "exp": 1705351200,                           // Expiration (Unix timestamp)
  "workspace": "acme-corp",                    // Workspace slug
  "isServiceAccount": "true",                  // Service account flag
  "groups": ["developers", "api-users"]        // Assigned groups
}
Token Validation
Centrali services validate JWT tokens by: 1. Verifying the signature using the issuer's public keys (JWKS) 2. Checking token expiration (exp claim) 3. Validating the issuer (iss claim) 4. Ensuring the token has required claims (workspace, isServiceAccount)
Service Account Management
List Service Accounts
curl -X GET "https://auth.centrali.io/workspace/acme-corp/api/v1/service-accounts" \
  -H "Authorization: Bearer <user-jwt-token>"
Query Parameters: - page (optional): Page number for pagination - limit (optional): Results per page
Get a Service Account
curl -X GET "https://auth.centrali.io/workspace/acme-corp/api/v1/service-accounts/sa_a1b2c3d4e5f60718293a4b5c6d7e8f90" \
  -H "Authorization: Bearer <user-jwt-token>"
Update Service Account Name
curl -X PUT "https://auth.centrali.io/workspace/acme-corp/api/v1/service-accounts/sa_a1b2c3d4e5f60718293a4b5c6d7e8f90/name" \
  -H "Authorization: Bearer <user-jwt-token>" \
  -H "Content-Type: application/json" \
  -d '{
    "name": "Updated Service Account Name"
  }'
Update Service Account Description
curl -X PUT "https://auth.centrali.io/workspace/acme-corp/api/v1/service-accounts/sa_a1b2c3d4e5f60718293a4b5c6d7e8f90/description" \
  -H "Authorization: Bearer <user-jwt-token>" \
  -H "Content-Type: application/json" \
  -d '{
    "description": "Updated description for this service account"
  }'
Rotate Client Secret
If your client secret is compromised or you need to rotate it for security:
curl -X POST "https://auth.centrali.io/workspace/acme-corp/api/v1/service-accounts/sa_a1b2c3d4e5f60718293a4b5c6d7e8f90/rotate" \
  -H "Authorization: Bearer <user-jwt-token>"
Response:
{
  "id": 123,
  "clientId": "sa_a1b2c3d4e5f60718293a4b5c6d7e8f90",
  "clientSecret": "<rotated-client-secret>",
  "name": "Production API Client",
  "workspace": "acme-corp",
  "updatedAt": "2025-01-16T14:20:00Z"
}
⚠️ Important: The old secret is immediately invalidated. Update all systems using the old secret.
Revoke a Service Account
Temporarily disable a service account without deleting it:
curl -X POST "https://auth.centrali.io/workspace/acme-corp/api/v1/service-accounts/sa_a1b2c3d4e5f60718293a4b5c6d7e8f90/revoke" \
  -H "Authorization: Bearer <user-jwt-token>"
Delete a Service Account
Permanently delete a service account:
curl -X DELETE "https://auth.centrali.io/workspace/acme-corp/api/v1/service-accounts/sa_a1b2c3d4e5f60718293a4b5c6d7e8f90" \
  -H "Authorization: Bearer <user-jwt-token>"
Troubleshooting
Error: "Invalid client credentials"
Cause: The client_id or client_secret is incorrect.
Solution: - Verify you're using the correct credentials - Ensure there are no extra spaces or line breaks - Check that the service account hasn't been revoked or deleted - If the secret is lost, rotate it to generate a new one
Error: "Token expired"
Cause: Your JWT token has expired (lifetime: 1 hour).
Solution: - Request a new token using the token endpoint - Implement automatic token refresh in your application
Error: "Forbidden: Invalid API Key" or "Unauthorized"
Cause: - Missing Authorization header - Malformed JWT token - Token belongs to a different workspace
Solution: - Ensure you're including the Authorization: Bearer <token> header - Verify the token is for the correct workspace - Check that your service account has the necessary permissions
Error: "Service account not found"
Cause: The service account was deleted or doesn't exist.
Solution: - Verify the service account ID - List all service accounts to confirm it exists - Create a new service account if necessary
Token Claims Missing Workspace
Cause: Service account wasn't properly created with workspace association.
Solution: - Ensure you created the service account via the workspace-scoped endpoint - Recreate the service account using the correct endpoint
Best Practices
-
Secure Storage: Store
client_secretin environment variables or secret management systems (e.g., AWS Secrets Manager, HashiCorp Vault) -
Token Caching: Cache and reuse JWT tokens until they expire to reduce token requests
-
Least Privilege: Assign service accounts to groups with minimal required permissions
-
Regular Rotation: Rotate client secrets periodically (e.g., every 90 days)
-
Monitoring: Log and monitor service account usage for security auditing
-
Error Handling: Implement retry logic with exponential backoff for token requests
-
Multiple Accounts: Use separate service accounts for different applications or environments
Complete Example: Python Script
Here's a complete example that obtains a token and makes an API request:
import requests
import time
from datetime import datetime, timedelta

class CentraliClient:
    def __init__(self, client_id, client_secret, workspace_slug, base_url="https://api.centrali.io"):
        self.client_id = client_id
        self.client_secret = client_secret
        self.workspace_slug = workspace_slug
        self.base_url = base_url
        self.token_url = f"https://auth.centrali.io/oauth/token"
        self.access_token = None
        self.token_expiry = None

    def get_access_token(self):
        """Obtain a new JWT access token"""
        if self.access_token and self.token_expiry and datetime.now() < self.token_expiry:
            return self.access_token

        payload = {
            "grant_type": "client_credentials",
            "client_id": self.client_id,
            "client_secret": self.client_secret,
            "scope": "openid"
        }

        response = requests.post(
            self.token_url,
            data=payload,
            headers={"Content-Type": "application/x-www-form-urlencoded"}
        )

        if response.status_code != 200:
            raise Exception(f"Failed to obtain token: {response.text}")

        token_data = response.json()
        self.access_token = token_data["access_token"]
        expires_in = token_data.get("expires_in", 3600)
        self.token_expiry = datetime.now() + timedelta(seconds=expires_in - 300)  # Refresh 5 min early

        return self.access_token

    def make_request(self, method, endpoint, **kwargs):
        """Make an authenticated API request"""
        token = self.get_access_token()
        headers = kwargs.pop("headers", {})
        headers["Authorization"] = f"Bearer {token}"

        url = f"{self.base_url}/data/workspace/{self.workspace_slug}/api/v1{endpoint}"
        response = requests.request(method, url, headers=headers, **kwargs)

        return response

# Usage
client = CentraliClient(
    client_id="sa_a1b2c3d4e5f60718293a4b5c6d7e8f90",
    client_secret=os.environ["SERVICE_ACCOUNT_CLIENT_SECRET"],
    workspace_slug="acme-corp"
)

# List collections
response = client.make_request("GET", "/collections")
collections = response.json()
print(f"Found {len(collections['data'])} collections")

# Create a record
response = client.make_request(
    "POST",
    "/records/slug/products",
    json={
        "name": "Laptop Pro",
        "price": 1299.99
    }
)
record = response.json()
print(f"Created record: {record['id']}")
Support
For additional help: - Check the Centrali API Documentation - Read the Authentication Overview for auth path selection - Read the External Auth (BYOT) guide if your requests should carry user identity - Review the OAuth 2.0 Client Credentials Flow - Contact your workspace administrator for permission issues
Service-account path identifiers
Every account-specific /service-accounts/{clientId} path uses the account's clientId string, including groups, roles, dev tokens, and permission scan/simulate. Obtain it from the create or list response; existing legacy client IDs remain valid. Numeric database IDs are rejected with a 400 explaining that clientId is required. Unknown or other-workspace client IDs return 404.
This replaces the previous mixed numeric-ID/client-ID route contract. Update scripts and installed MCP clients together with IAM; older MCP tools passing serviceAccountId to account-path operations must switch to the string clientId argument. The numeric id remains in responses for separate access-evaluation, remediation, and role-query contracts; database keys are unchanged.